


With only one life to live, I value being as efficient with my HAVE TOs as humanly possible, leaving more time for all of my GET TOs. This means that automating business admin tasks is priority #1.
It’s not always easy or straightforward, but it’s ALWAYS worth it. I have a stubborn belief that whatever I want is possible, which means that I chisel my way through learning new tools and processes until I get EXACTLY what I want.
That’s how I’ve been able to create this completely hands-off process for selling my membership through ThriveCart and delivering it through MemberVault.
Automating Across Multiple Platforms Seamlessly
MemberVault is an amazingly powerful tool for content hosting and monetizing products and services that you want to sell in your business.
Although MemberVault has a shop interface and allows recurring payments, I already owned ThriveCart before coming to MemberVault, and I wanted to host my shop directly on my website, so I use ThriveCart for selling my annual membership for Dubsado Pros.
As an automation specialist, it would be philosophically impossible for me to have any single part of this process be manual, so I’ve put together a system of tools that work for me. The flow is the same no matter what platform I’m using or what product it is:
Adding New Member to the Product in MemberVault
STEP ONE: Set up your checkout and connect it to your email marketing software
I sell my membership primarily through my main website, and I have a sales page dedicated to it. When someone wants to purchase, they are sent through ThriveCart. ThriveCart has a direct integration with ActiveCampaign, which allows me to do advanced tagging based on their behavior with the product in ThriveCart. In regular-person-speak, that means that when they purchase my membership, ThriveCart will automatically add them to my “Membership Purchased” tag in ActiveCampaign.
QUICK NOTE: My membership is called The Dub Club, abbreviated as ‘TDC’, so you’ll see that abbreviation throughout the screenshots and directions that I’ve provided.

STEP TWO: Set up your email marketing automations to connect to MemberVault
Once the “Membership Purchased” tag is added in ActiveCampaign, that triggers my ActiveCampaign automations. ActiveCampaign subscribes them to the appropriate email lists in my system, adds them to the product in MemberVault using the Advanced Integration Webhook, and emails them with access information!
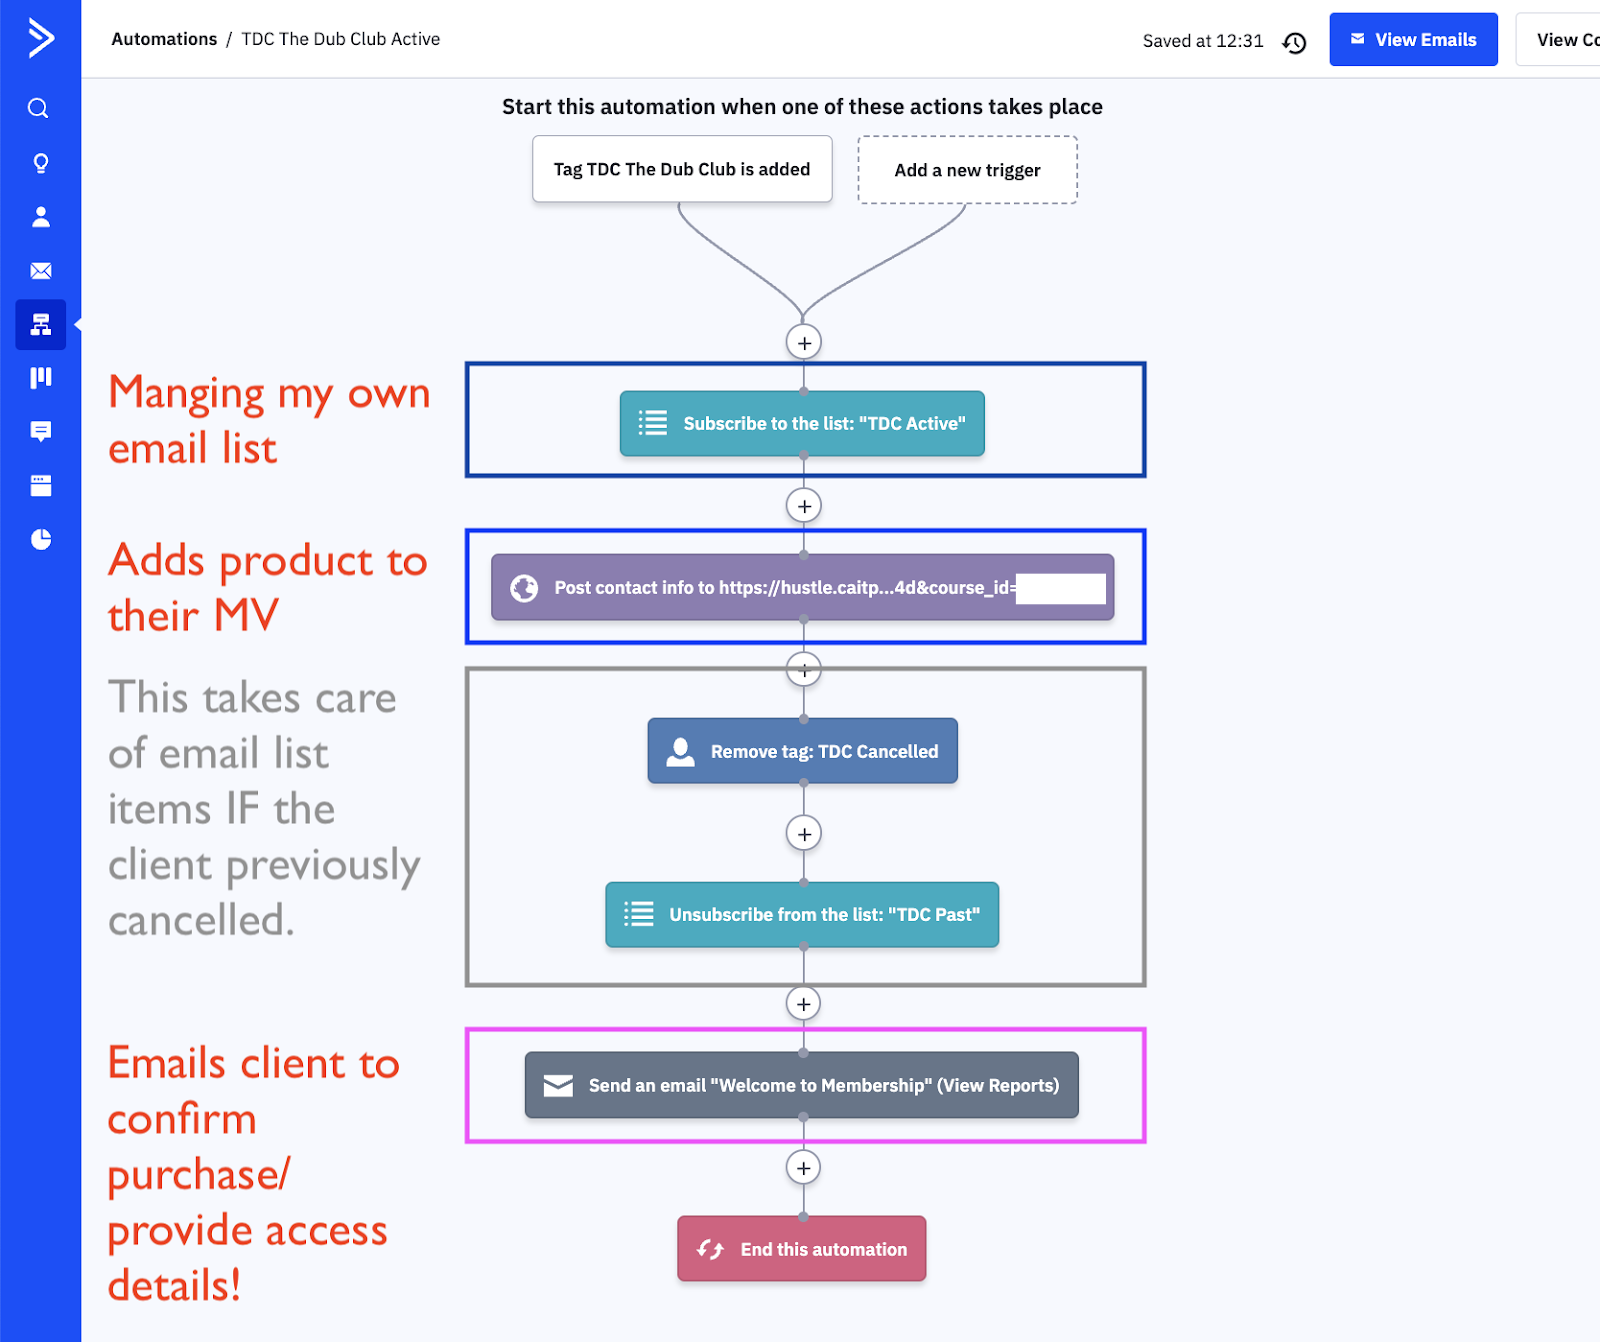
THAT’S IT! Two steps is all you need for this part of the process!
Canceling a Membership Through a 3rd Party & Removing from MemberVault
STEP ONE: Create Easy Access to 3rd Party Cancellation Vault
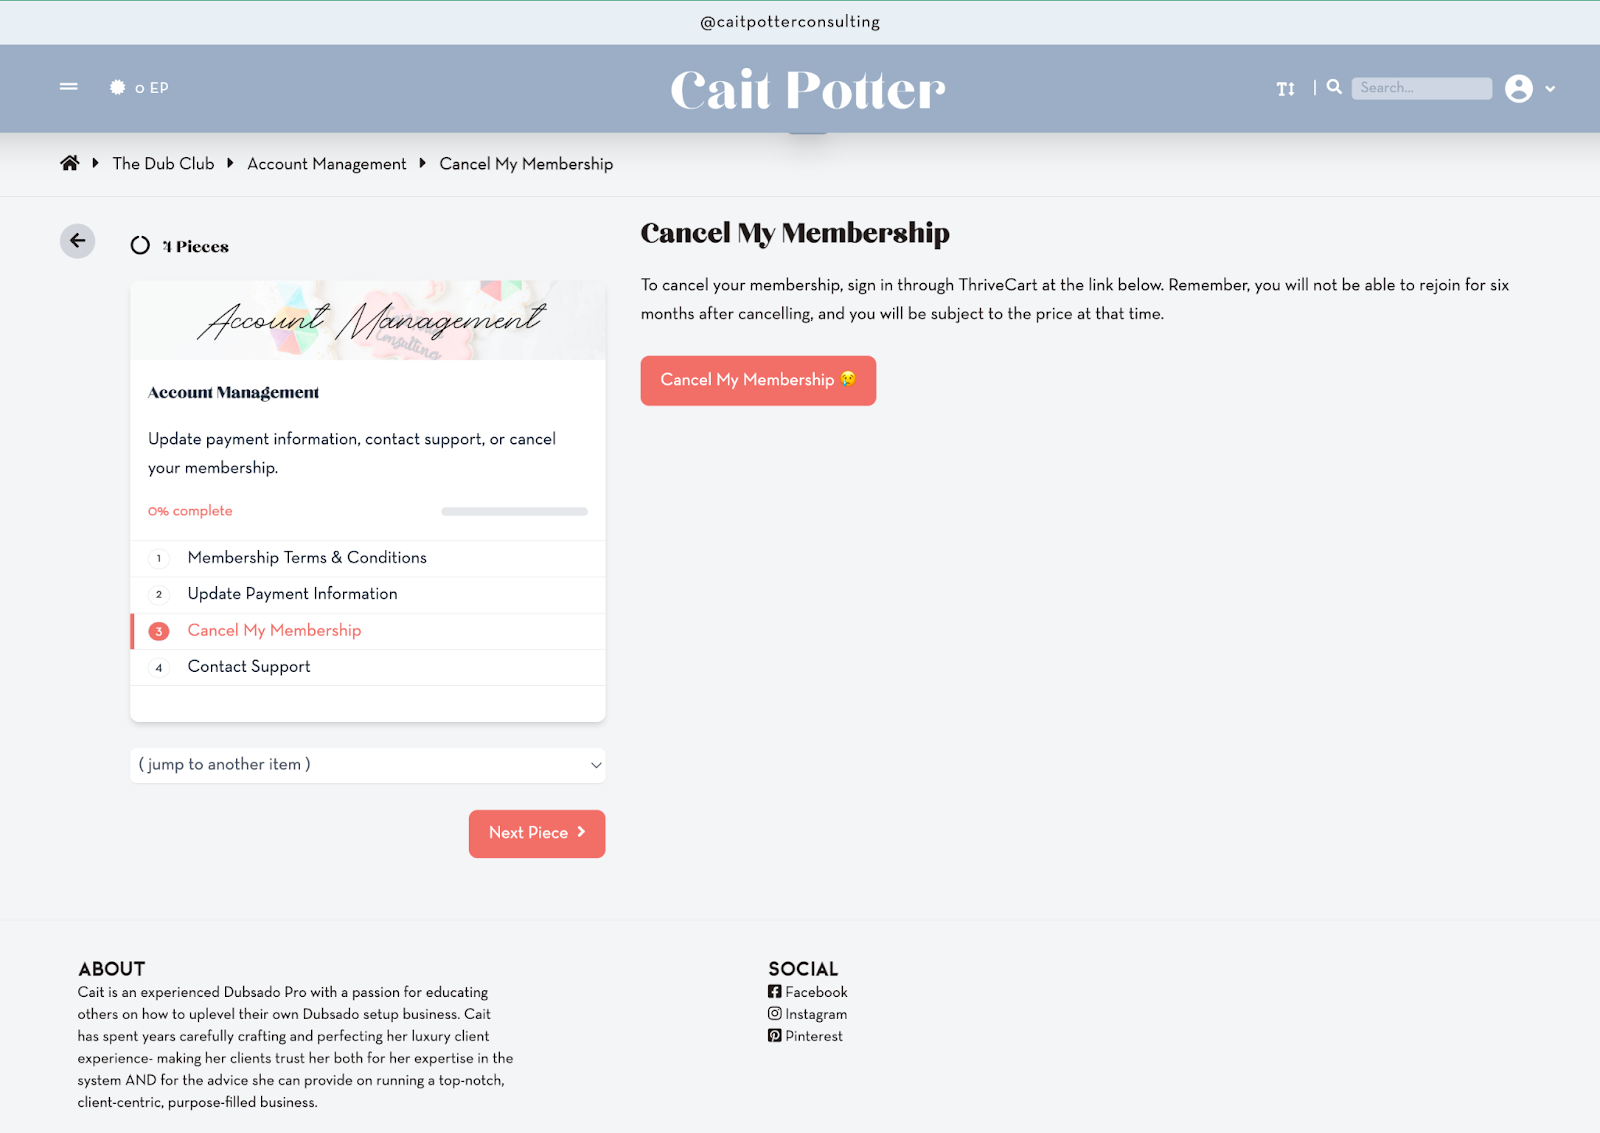
Inside my membership product in MemberVault, I created an “Account Management” module. One of the options in this module is to “Cancel My Membership”, and that module includes the link to their ThriveCart portal where they can login and cancel their membership. 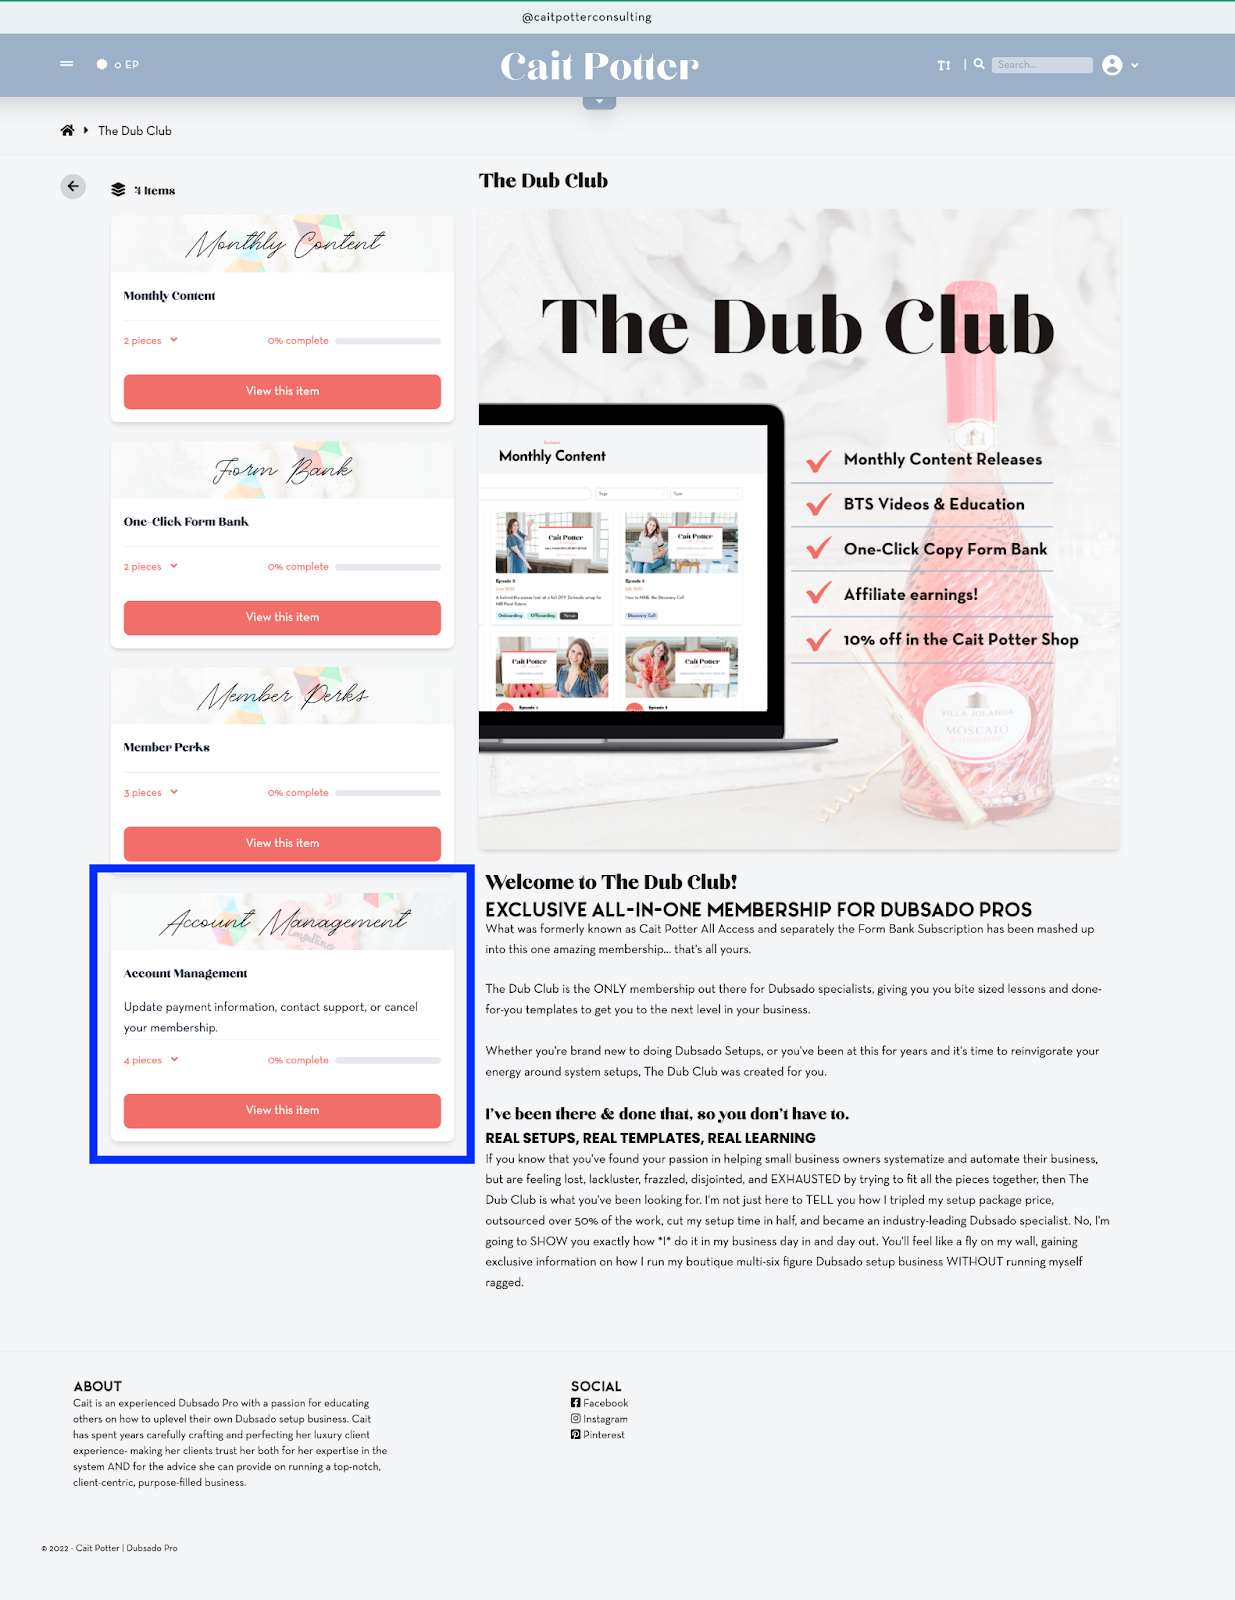
STEP TWO: Set Up Automations to Communicate from 3rd Party to ActiveCampaign
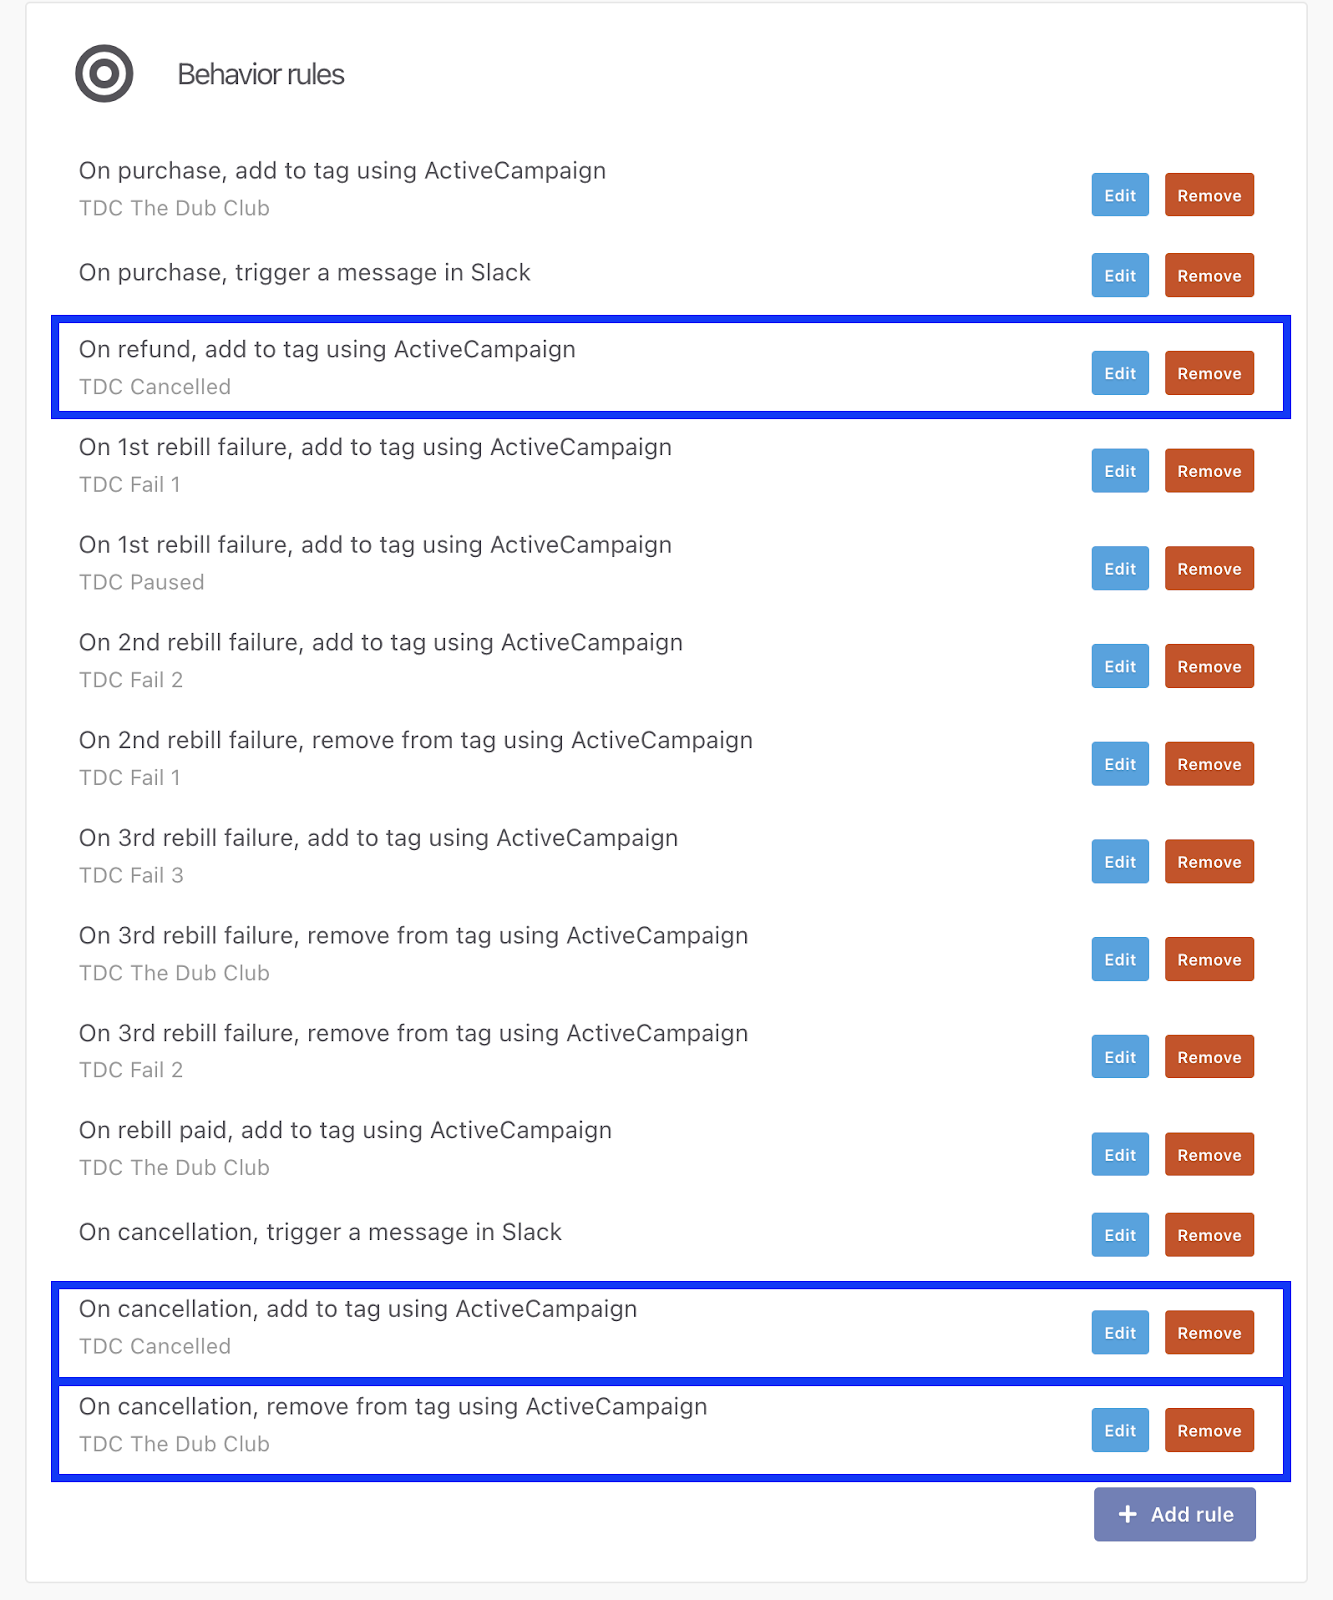
When they cancel in ThriveCart (or if I refund them for whatever reason), ThriveCart automatically adds a tag for “Membership Cancelled” in ActiveCampaign from the “Behavior” tab inside of the individual product details.
Side note: You’ll see in the screenshot below that on Cancellation, I also REMOVE them from the tag that I use to indicate a membership is active. This is so that if they re-join later, they’ll get the tag added to their contact and ActiveCampaign will send them through the welcome sequence again (adding the MemberVault product to their account, emailing them, etc.).
IF the 3rd party software you’re using does NOT have this option to automatically add tags to your email service provider like ThriveCart does, this is where I would get Zapier involved. For example, IF this connection between TC and AC didn’t exist, I could go to Zapier and set up the trigger as “Recurring Payments Cancelled” in ThriveCart and set up the action as “Add Tag in ActiveCampaign” in order to achieve the same effect. This is just one alternative solution for how to handle this depending on your situation, but the important thing to remember is that there is ALWAYS a way to automate if you look hard enough! The time you spend up front will save you in the long run, plus it will free up your mental energy to focus on money making activities. Anyway, off my soapbox and back to the step-by-step.
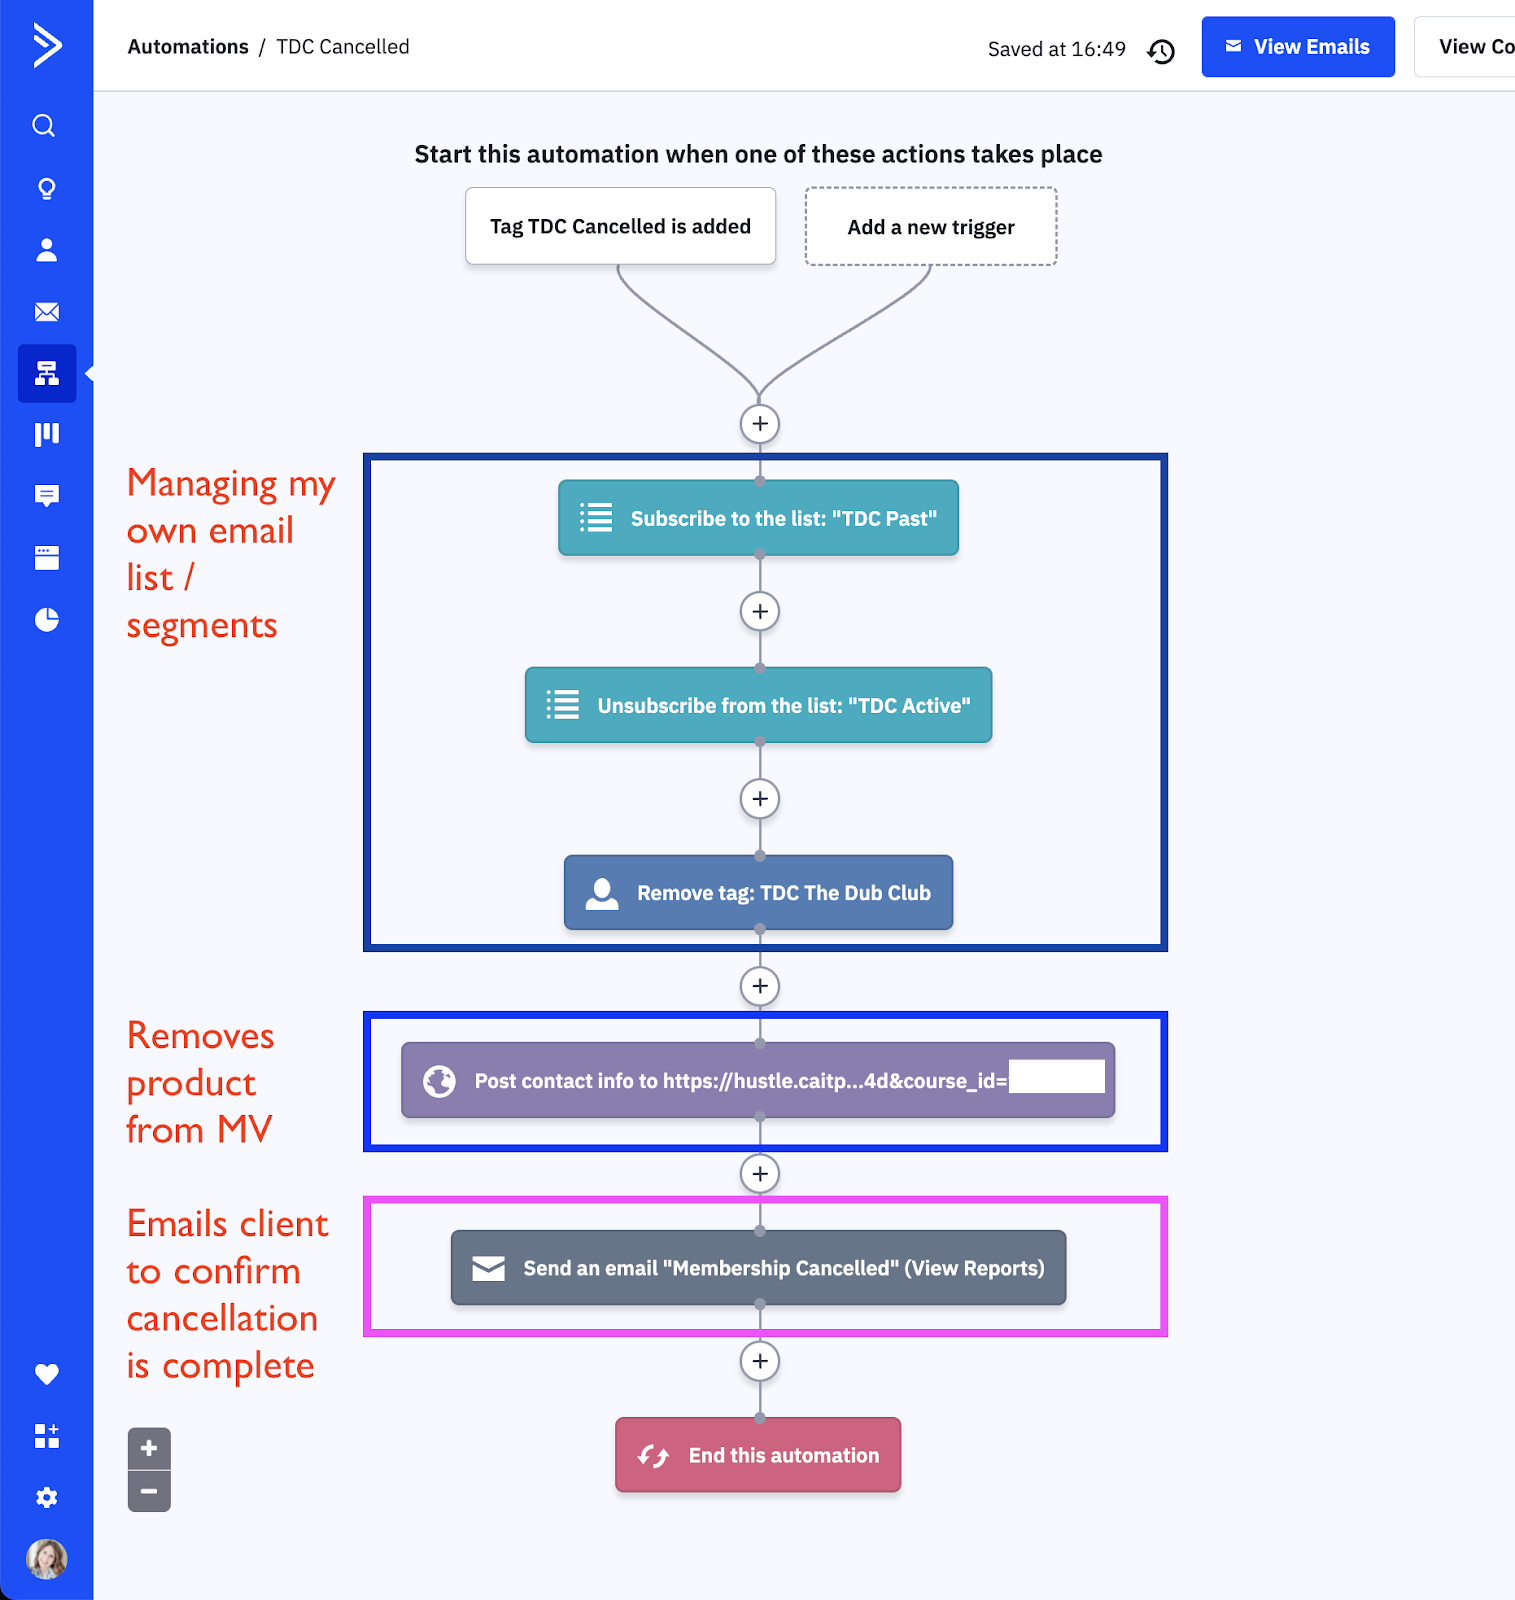
STEP THREE: Let AC Trigger All Needed Cancellation Actions
When the “Membership Cancelled” tag is added in ActiveCampaign, AC runs an automation to remove them from the product in MemberVault (using the Advanced Integration ActiveCampaign Webhook for removing from products). It also takes a few other steps that I need to happen, such as updating which of my email lists they are subscribed to and emailing the client to confirm that the cancellation has been received and has taken place.
So how can you do this for yourself?
If you’re like “I just need a step-by-step guide to get this done”, then this section is for you!
- Create your product in MemberVault
- Create the required tags in ActiveCampaign / your email marketing software. As an example:
- Membership Purchased
- Membership Cancelled
- Create your product in your 3rd party checkout software, like ThriveCart
- Set up your automations to add and remove tags in your email marketing software based on customer behavior (whether through the built in software or through Zapier):
- Add “Membership Purchased” on purchase
- Add “Membership Cancelled” and Remove “Membership Purchased” on Cancellation
- Set up your automations to add and remove tags in your email marketing software based on customer behavior (whether through the built in software or through Zapier):
- Create your email marketing automations
- Update which lists your customer is subscribed to on purchase
- Update which lists your customer is subscribed to on cancellation
- Add them to the product in MemberVault (using the advanced integration webhooks) on purchase
- Remove them from the product in MemberVaul t(using the advanced integration webhooks) on cancellation
- Email the client confirmation on purchase
- Email the client confirmation on cancellation
Voila! You now have a completely automated system for adding and removing customers from MemberVault products at the appropriate time. Automations don’t forget, they don’t make mistakes, and they don’t take vacation. This means that YOU no longer have to worry about these odds & ends tasks, and can instead focus on coming up with MORE ways to make money!
Connect with Cait!
If you found this article valuable, make sure you connect with Cait to learn more tips & tricks about automating things in your business!
- Join my Facebook group Busyness to Business for more help & resources: caitpotter.com/busyness
- Follow on Instagram! @caitpotterconsulting
Ongoing COO-level support to maintain and refine your systems as the business grows so operations stay steady and decisions stop piling up on your plate.

Support
Custom Dubsado, Airtable, and Moxie systems designed for capacity, not survival. Built around how your business actually runs so growth does not create more chaos.

Systems
Map, audit, or optimize the system that is slowing your business down. Workflows, offers, tech stacks, or the process that keeps living in your head instead of your business.

Strategy
These are.
Busy isn't a business plan.


In this power-packed session, I show you how to connect Airtable + your CRM for smarter tracking, simplified workflows, and insights that actually move your business forward.
From Guesswork to Growth with Airtable


You can’t automate what you don’t understand. Before you automate anything, you have to know your client journey inside and out. That’s where strategy starts - and where smart systems actually work.
What is "the client journey"?

Hot Seat, Hot Takes, Hot Damn.

Free masterclasses that show you exactly how scalable businesses are built.


© 0000 Cait Potter Creative, LLC
Privacy Statement and Terms & Conditions


